Thursday, July 28, 2011
Fabric Flower Tutorial and Hair Accessory Swap
Fabric Flowers are all the rage around these parts, and the girls in my house love to wear them in their hair. That's why I'm so excited to share this post with you.
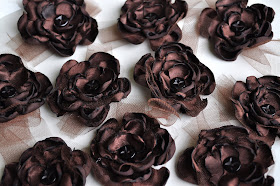
I've been invited to attend a "Hair Accessory Swap", and these are the flowers I made to trade. Ten ladies each commit to making ten hair accessories that all look identical. Then, we'll have a little get-together to exchange them so that at the end of the party, we'll bring home ten completely different hair accessories. Doesn't that sound like fun?!!
OK, here's how I made them...they are so easy.
Step 1- Cut out 4 sizes of circles in satin type fabric (100% Polyester). My largest circle was 3".
Cut out one small rectangle and 1 hour glass shape ( no larger than the smallest circle)
Cut out 3 sizes of circles in tulle of a coordinating color, and one rectangle for a tuft.
Step 2: cut 5 slits in each satin circle.
Step 3- Using a small flame, melt all of the edges of the fabric to create the look of flower petals. Be careful not to get the fabric too close or it will burn. Also melt the edges of the rectangle and hour glass shapes so they won't fray.
This is what they will look like when complete.
Step 4- Stack the petals with a layer of tulle between each layer of satin to add more dimension. Place the hour glass shaped petal in the center and then a coordinating button on top. Fold the rectangle of tulle into an accordion shape and place it under the flower. Sew the button through all of the layers to hold them together.
Step 5- Using a hot glue gun, glue the rectangle of satin to the back to cover the thread. Next, glue on a hair clip, or lapel pin to the top of the rectangle.
The finished product can be worn in the hair or on a blouse. Each one took me less than 20 minutes, and my total cost for all ten of them was less than $4.00.
I can't wait to see the other creative ideas at the hair accessory swap! I'm so excited!


Very cute!
ReplyDeleteI love them!
ReplyDeleteReally cute and don't look too hard to make, either. :)
ReplyDelete